|
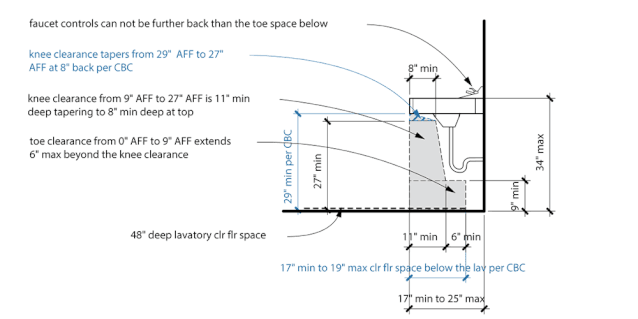
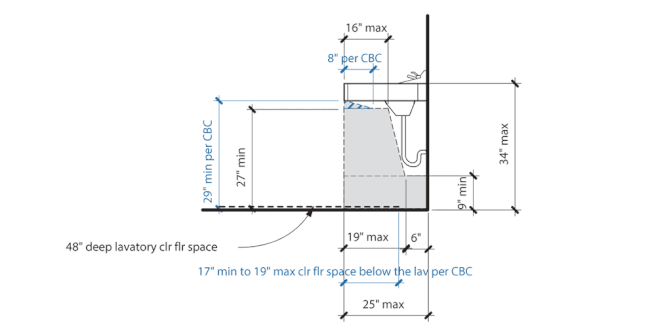
Contributed by Janis Kent, FAIA, CASp Lavatories have some of the more involved clearances, below which impact reach ranges above. The question of why is this important to understand might be arising in your thoughts. The answer is the impact on the location of faucet controls, soap dispensers, and any other built-in items including electrical outlets and switches. The knee clearance under a lavatory is 27” minimum height above the finished floor (AFF) extending horizontally from the front edge to a depth of 8”. If you are working in California, the height clearance tapers from the front edge at 29” AFF, down to 27” AFF at 8” back. The next portion of the knee clearance is tapered from 27” minimum AFF down to 9” minimum AFF at 11” back. The toe clearance requires an additional 6” horizontally beyond the bottom of this taper. This is nothing new, but what we often lose sight of, is this taper is at a rate of 1” depth for every 6” of height – a total of a 3” depth beyond the full 27” clear height. You can increase the depth at the lower portion of the taper more than 3” but the toe clearance is still calculated as starting 3” back from the top of the taper. Another way of looking at this is the furthest point of the toe depth is an additional 9” back maximum from the start of the taper at 27” AFF. For a lavatory with front approach, you need to remember that you cannot reach beyond your toes. So, if you have the minimum of 8” at the top + 3” of taper (the typical 11” minimum depth requirement) + 6” for your toes, this totals 17”. If this is the furthest your toes can go, the faucets and soap dispenser (if fixed) have to have their controls located within reach range. So, 17” maximum from the front edge of the lavatory counter or fixture. Let’s say you want the controls located further back at 19” – the recessed depth at 27” AFF needs to increase to 10” deep. So, you would have the 10” + 3” of taper + 6” for the toes to get you to 19” depth. In California the knee/toe clearance is stipulated to be 17” to 19” deep therefor the faucet controls and fixed soap dispenser always have to be within this reach range. The 2010 ADA Standards limits clear floor space depth at 25”, not 19”, which is the maximum reach depth for front approach. So outside California you would need the 27” minimum AFF clear height to a depth of 16” + 3” taper + 6” for your toes totaling 25” in order to get the maximum reach depth if something were to be placed on the back wall such as an outlet or switch. The California Building Code (CBC) does state you can have more clear floor space beyond, but this cannot be used for the lavatory clear floor space requirements. So, within California, all of the operable parts of a lavatory are required to be 19” maximum from the front edge, presuming you have increased the depth clearance to be 10” from the top front edge. Another issue, aside from the faucet control location, is if the lavatory is placed adjacent to a bathtub. The tub controls are also required to be within reach range. For instance, if the lavatory or its counter is 22” deep and the tub controls are placed on this back wall to the side of the counter, you would have to consider one of two options. You would need to provide 22” depth of knee/toe clearance below so that would be 13” deep at 27” AFF + 3” taper + 6” for toe clearance at a minimum. This would be true in California as well as under ADA, but in California you could not use this extra clear depth for reach to the lavatory controls, just the tub. The other option would be to extend the lavatory countertop to provide a 30” width of counter between the edge of the lavatory to the tub with knee/toe clearance below to the back wall. So, do be careful of where you place your faucet controls in relation to the clearance below and if the lavatory is adjacent to a bathtub, be aware of providing knee/toe clearance to reach the controls located on the tub end wall. One more item to consider. If the underside of the lavatory is more than 27” AFF clear height for the front 8” or more of depth, and if the fixture (or its counter) can be reached from the side of the fixture, you might now have a protruding object that is more than 4” from the wall, which would then require a cane detectable barrier. If the front edge of the lavatory is at 27” AFF exactly, this is a non-issue. But if you are in California, the front 8” (to 10”) tapers from 29” minimum AFF down to 27” AFF. So, in California, if you can approach the side of the lavatory you will most likely always have a protruding object and a cane detectable barrier is needed. This can be as simple as providing a side piece to the counter, where the leading edge goes down to 27” or less AFF. But keep in mind, this side piece might need to provide 18” minimum clear from the centerline of the lavatory in California if it goes below 27” AFF. So, this sums up why knee/toe clearances, reach ranges, and protruding objects for lavatories are important to understand. NOTE: Be aware that your local City or County may have additional requirements that are more restrictive than the State or Federal requirements. Also, this article is an interpretation and opinion of the writer. It is meant as a summary – current original regulations should always be reviewed when making any decisions. This article originally appears on the contributor's website as 'The Lavatory — Clear Floor Spaces, Reach Ranges, & Protruding Objects' © 2018 SEE JANIS SPEAK AT CONSTRUCTJanis Kent, FAIA, CASp is a licensed California Architect, and has been involved with Access in the built environment since the mid-1980‘s. She is designated a Subject Matter Expert (SME) by the California Division of the State Architect, a Certified Access Specialist, and participates in developing the state CASp exams.
Join Janis for 'Accessibility: A Real-World View of Recurrent Non-Complying Elements', being presented on Wednesday, October 3 from 10:35 AM to 11:50 AM at CONSTRUCT in Long Beach. Overview ADA and other accessibility regulations have been around for well over 25 years, yet we still see items of non-compliance even in new construction. Is this due to a lack of knowledge, incomplete drawings and specifications, sloppy construction or is it that the topic has become so complex that it is difficult to synthesize all of the relevant information? Many of the items are indeed extremely technical, yet the solutions need to be incorporated at the early non-technical design stages. This program will provide an in-depth look at many common items in non compliance and violations often found in new construction and alterations. Learn through a visual synthesis of photographs with pertinent regulation call-outs of numerous existing installations. We’ll discuss what went wrong, was missing, or misunderstood, in order to recognize access issues to be on the lookout for and how to better incorporate pertinent information into construction documents and specifications. Upon completion of this program, participants will be able to: 1. Identify typical non-complying items before they are built 2. Recognize what needs to be addressed early for compliant access later 3. Distinguish those elements that require more attention during design and construction for compliant installation 4. Discuss what is required for successful access implementation Register TODAY for CONSTRUCT, as registration costs increase at midnight Thursday, July 26 The special URL above offers you a 5% discount on the Education package, or a Free Expo Hall Pass.
0 Comments
Leave a Reply. |
AboutLet's Fix Construction is an avenue to offer creative solutions, separate myths from facts and erase misconceptions about the architecture, engineering and construction (AEC) industry. Check out Cherise's latest podcast
Get blog post notifications hereArchives
March 2022
Categories
All
|


 RSS Feed
