 Contributed by Jason Spangler For years now, the in situ relative humidity (RH) test for measuring the moisture condition of concrete has been shown to be the most reliable, accurate test available.
As far back as the 1960s, laboratories at the Portland Cement Association conducted controlled tests that verified the accuracy of RH testing. This research was followed by years of additional testing at Lund University in Sweden and elsewhere. In 2002, ASTM International first established the F2170 standard for conducting RH tests on concrete slabs. The research confirmed two key discoveries:
Other methods typically involve taking measurements only at the surface of the slab. As the research has found, a surface-based moisture test can’t provide an accurate measure of a slab’s true moisture condition. That’s because it doesn’t account for the moisture conditions deeper within the slab, and those conditions are typically quite different than conditions at the surface. The Standard Evolves as the Science Tells Us More The initial ASTM F2170 for in situ RH testing was established in 2002, after continuing research at Scandinavian universities in the 1990s identified the exact specifications for conducting a reliably accurate RH test—placing the test probe at 40 percent depth for slabs poured on grade or 20 percent for slabs drying from both sides. After these scientifically-validated specifications were firmly established, ASTM International published a usable standard. Until now, the ASTM F2170 standard has required a 72-hour waiting period between drilling the test holes where the RH probes are placed and taking official RH measurements. In practice, readings are often taken before the 72 hours has passed, so contractors have an idea of how things are trending. But because the official readings couldn’t be taken before 72 hours, that meant all decisions and work were basically on hold for those three days. Full stop. Yet we’ve seen how the research on the RH test method has helped to refine our understanding of how best to use it. This trend continues. In 2014, a Precision and Bias (P&B) study, commissioned by the ASTM committee, tested for differences in RH readings at various intervals within the 72-hour period. In part, the idea was to assess if it is actually necessary to wait the full 72 hours for an accurate, actionable moisture readings.
0 Comments
 Contributed by Eric D. Lussier The space is enclosed, the HVAC is running and the basketball backboards are in place. The final touch to your athletic facility is the only item outstanding: the sports floor. You have made your selection and the contractor is scheduled. All you need to worry about is the completed installation, right? Well, have you put thought into periodic maintenance? You always want your facility to look clean and new, but some floors take more work than others. The following provides insights into the various finish options and upkeep factors that must be considered when it comes to choosing from among the many athletic surface options.
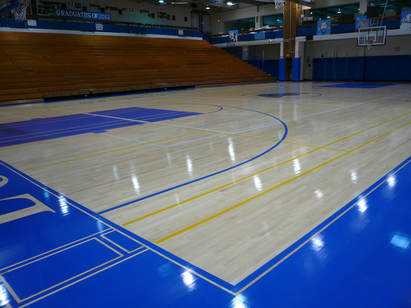
CONCRETE It seems ridiculous to start the overview with what could seem like no flooring at all, but due to its lifespan and durability, concrete remains a choice in the athletic flooring market. If you are building a new facility, chances are concrete serves as your base substrate regardless of what floor surface is specified. And, whether it is intended for team or individual sports, or for multipurpose use, chances are those activities can occur on a concrete surface. The downside of a concrete surface, however, is the safety factor. While a player may not think twice about shooting hoops on an outdoor concrete basketball court, that same person would likely be apprehensive about lacing up their high tops on an indoor concrete court. Why? Because concrete doesn’t offer any sporting characteristics, such as force reduction, also known as shock absorption. ASTM F2569, Standard Test Method for Evaluating the Force Reduction Properties of Surfaces for Athletic Usability, defines force reduction as the “ability of a surface to reduce impact forces as compared to a rigid surface using a specified impact.” Concrete on its own offers no force reduction. ASTM F2569 was repackaged in the official sports flooring standard: ASTM F2772, Standard Specification for Athletic Performance Properties of Indoor Sports Floor Systems. In 2009, additional criteria were added for surface finish effect, which is the slip and grip of a floor, known as coefficient of friction. Nevertheless, if team or court games will be played on a concrete surface, one important finish application is game lines. Pay attention to the coating used to mark lines on any athletic flooring, as heavy foot traffic and cleaning equipment can take a toll on the paint used. Typically, a polyurethane-based coating with a hardening catalyst is specified for longevity reasons. The concrete surface may also receive a stain or a polish before usage. With these kinds of finishes, high-traffic areas will require upkeep much sooner than low-traffic areas, but one can expect to refinish the surface anywhere from five to 20 years, depending on usage.  Contributed by Matt Porta As we put 2016 to bed and kick off 2017, the need to rise above, stay positive, and the need to pursue excellence seems even more important than ever. Today's post is step one of my perspective and attempt to articulate in writing what I hope to accomplish with my firm, Hord Coplan Macht, in 2017. My goal is for this post to be one of a regular series, each building upon the previous.
An Introduction: Some time around 2003 we started to see a shift in the overall project schedule here in Colorado. For me, it was with the design and construction of the Excel Academy Charter School. It was a new school building for an established charter school in Arvada, CO. We were hired, along with our construction partner, Saunders Construction, in the fall. The goal was to design, permit, and construct a new 44,000 square foot school building on a five acre site in time for the 2004 school year. The SLATERPAULL design team geared up, worked side by side with Saunders and completed construction drawings before Christmas, broke ground in January and were complete in August. We were able to construct a very unique solution, outside of the gymnasium, and there is barely a single right angle in the building. The project won a tilt-up concrete construction award and began the basis of the new normal as it relates to the design and construction schedule. Success begets opportunity and this same design and construction team was selected by the Jefferson County School District to build a new 63,000 elementary school, the first new school of their successful 2004 bond election. We interviewed and were selected in January of 2005, started design immediately, completed phased construction documents, with the site drawings issued in April and the building in June. Construction began in May and the school was completed by August of 2006. This new school, again a tilt-up concrete award winner, became the new benchmark for new public school design and construction and hence the official start of the new normal, where every bond funded school project in Colorado seems to follow. What I have learned in our fast paced design and construction world is that expectations for excellence by our owners have not changed. A process that used to be scheduled over 30 months is now completed in 18. The biggest concern I have personally and professionally with this level of schedule acceleration is maintaining quality. Quality of our designs, quality of our details, quality of the overall coordination of our documents and the overall quality of construction. So, if am worried about quality, what do I propose we do about it... Stay tuned for part two. 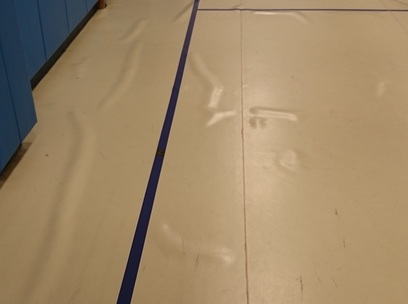 Contributed by Eric D. Lussier I’m quickly approaching eleven years working in and around indoor flooring, focusing mainly on sport and synthetic surfaces. Eleven years of projects of all shapes and sizes ranging from 250 square foot residential basements to 30,000 square foot college field houses. Eleven years of existing conditions, renovations, rehabilitations and new construction and the one constant that rears its ugly head on almost each job are substrate conditions, and especially concrete moisture. Conversely, said moisture issues are seemingly new news to whomever I am working with: whether that is architects, construction managers, general contractors or end users.
There are more than a few instances that can lead to high moisture in a concrete slab. Whether it is an over-watered pour, a lack of a quality vapor barrier, a compromised vapor barrier, or a missing one entirely (either from degradation or lack of placement), a fast track installation with insufficient time for the concrete to dry, an inoperable or missing HVAC system or a handful of other events. No matter the occurrence, it can all equate to the same headaches after the fact. Normally fingers are pointed, voices are raised, materials are ripped out and unnecessary time and money is spent to potentially repair or replace flooring that perhaps should have never been installed to begin with. Industry-speak may call it “flooring failure” but most of the time the flooring is performing exactly as it is supposed to. The adhesive on the other hand, may be completely failing. New construction technologies have our buildings tighter than ever. With the use of a proper vapor barrier removing the ground from the equation, concrete moisture has no place to go but up and through the slab. When placing a fully adhered, non-breathing floor, such as a heat-welded sheet vinyl on the slab, concrete moisture in an untreated slab travels up and out, trying to push through the adhesive and new floor in the process. Even though the norm in the industry has raised from 3 lbs. of moisture to 5 lbs., as per ASTM F1869-11 (Standard Test Method for Measuring Moisture Vapor Emission Rate of Concrete Subfloor Using Anhydrous Calcium Chloride), that limit can take substantial time to achieve when it comes to new construction. Speaking of norms in the industry, thankfully most flooring manufacturers have moved away from recognizing calcium chloride testing (which is more of a snapshot of what is happening emanating from just the top of the slab) towards in-slab relative humidity (RH) testing (what is going on inside the slab). Testing as per ASTM F2170-11 (Standard Test Method for Determining Relative Humidity in Concrete Floor Slabs Using In-Situ Probes (has become easier over the last handful of years with developed equipment, including testing probes that can be left in the slab and reusable digital probes. It is always recommended that an independent third-party is specified to test the concrete for moisture and not the General Contractor or flooring contractor themselves. It could be viewed that each party has a vested interest in ensuring that results are swayed their way. If you are looking for a certified concrete moisture testing party, the International Concrete Repair Institute offers a moisture testing certification program and you can search the certified testers here.  Contributed by Joseph Lstiburek of Building Science Corporation The perfect wall is an environmental separator—it has to keep the outside out and the inside in. In order to do this the wall assembly has to control rain, air, vapor and heat. In the old days we had one material to do this: rocks. We would pile a bunch or rocks up and have the rocks do it all. But over time rocks lost their appeal. They were heavy and fell down a lot. Heavy means expensive and falling down is annoying. So construction evolved. Today walls need four principal control layers—especially if we don’t build out of rocks. They are presented in order of importance:
The best place for the control layers is to locate them on the outside of the structure in order to protect the structure (See Figure 1). When we built out of rocks the rocks didn’t need much protection. When we build out of steel and wood we need to protect the steel and wood. And since most of the bad stuff comes from outside the best place to control the bad stuff is on the outside of the structure before it gets to the structure. Also, after generations of building out of rocks folks somehow got the idea that they wanted to be comfortable—and they figured out that rocks were not the best insulation. I mean rocks are not that bad compared to windows—memo to architects: you can’t build an energy efficient green building out of glass, but you can get design awards and we all know which is more important. Back to rocks, they are heavy and you need a lot of them to make the wall have any decent thermal resistance so we invented thermal insulation. But where to put the insulation? If we put the insulation on the inside of the structure the insulation does not protect the structure from heat and cold. Remember we really do want to protect that darn structure—especially for the sake of making the structural engineers life more happy. Expansion, contraction, corrosion, decay, ultra violet radiation, and almost all bad things all are functions of temperature. So all the control layers go on the outside. Keep the structure from going through temperature extremes and protect it from water in its various forms and ultra violet radiation and life is good. 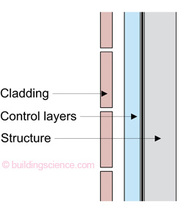 Figure 1 (Above): “The Perfect Wall”—In concept the perfect wall has the rainwater control layer, the air control layer, the vapor control layer and the thermal control layer on the exterior of the structure. The claddings function is principally to act a an ultra-violet screen. Oh, and architects might consider the aesthetics of the cladding to be important.
What about this air control thing? Well air can carry a lot of water and water is bad for the structure. So we have to keep air out of the structure as well because of the air-water thing—or if we let it get into the structure we have to make sure it does not get cold enough to drop its water. Now, just one other thing, tends to be important if you intend on living in the building or working in the building or keeping things safe in the building, we might want to control the interior environment. We especially ought to be concerned about what is in the interior air because when we are in the interior we tend to breathe it. Well, it turns out that we can’t control air until we enclose air. So we need an honest to god airtight enclosure in order to provide conditioning such as filtration and air change and temperature and humidity control. And once again the best place to control this air thing is on the outside of the structure—but under the insulation layer so the air does not change temperature. Presto: the perfect wall. A water control layer, air control layer and vapor control layer directly on the structure and a thermal control layer over the top of the other control layers (see Figure 1 again). This was figured out long before I was born—I think the Canadians figured it out first [1], but the Norwegians have some claims to this plus the Russians. I am going to go with the Canadians on this one because I am biased and proud of it. Also, I met Professor Hutcheon, and that is a story for the grandkids when I get some—memo to Christy and Andrew: so what’s the delay here? For a more detailed discussion of the physics of all of this go to the old masters: Hutcheon and Handegord [2] and the new kids on the block Burnett and Straube [3]. In a beautiful bit of elegance and symmetry if you lie the perfect wall down you get the perfect roof (Figure 2) and then when you flip it the other way you get the perfect slab (Figure 3). The physics of walls, roofs and slabs are pretty much the same—no surprise (Figure 4). This insight was shone into a whole generation of practitioners by Max Baker [4] when I was first getting started. Click Read More ------> |
AboutLet's Fix Construction is an avenue to offer creative solutions, separate myths from facts and erase misconceptions about the architecture, engineering and construction (AEC) industry. Check out Cherise's latest podcast

Get blog post notifications hereArchives
March 2022
Categories
All
|
 RSS Feed
